• Home
  • About
  • Personal Projects
  • Photography
  • Blog
  • Contact
Menu

Siân Wright

  • Home
  • About
  • Personal Projects
  • Photography
  • Blog
  • Contact
1488472372793.jpeg

A brave new world...

May 21, 2017

I don't know how it happened, but somehow it's already May 2017. I told myself that I would blog at least once a month and my previous blog post dates December 2016... THIS IS NOT ACCEPTABLE. Anyway, what have I been up to? Good question. For those of you who read my blog which are probably very few, I bought an Intrepid large format camera which arrived in the new year. It's taken five months to get round to using it but I got there. Ladies and gentlemen, I give you the first decent test image I've taken: 5x4testsianwright

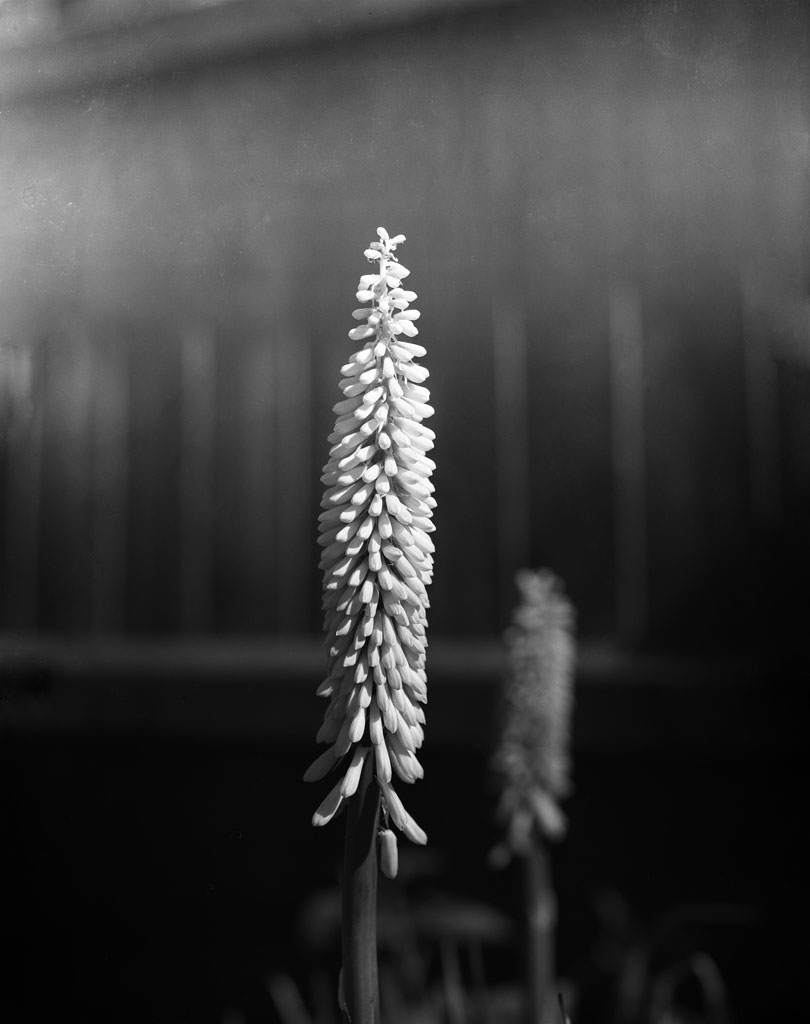
I've had a few problems regarding film development, dropping my wet negatives on the carpet were one of them so excuse the flecks of dust.

For whatever reason, FP4+ film and Rodinal have produced mixed results for me so I've ended up using the standing development technique for the first time. Unfortunately, as I was using the MOD54 there is a gradation in tonality where the image is darker at the bottom than the top. If this was developed in a tray I think this technique would have worked really well, particularly for lazy people who can't be bothered to agitate!

Those of you unfamiliar with processing black and white film, you would normally load the film in a spool/holder in the dark and dip the film in developer, stopper and fixer chemicals for specific amounts of time. Throughout the development phase, you would agitate for 5-10s every minute to ensure that the film processes evenly but with standing development, you just agitate for the first few minutes and leave it for an hour in a water bath (optional). With standing development, it produces the appearance of a sharper image by contrasting the blacks and highlights very similar to an unsharp mask but it can result in haloing. This can work in some images but not for all.

People might wonder why there is a fascination with analogue film when digital photography is more cost effective and produces immediate results which has streamlined the entire industry. To put it in simple terms, a normal full frame DSLR is the equivalent to a 35mm frame which takes an approximate image of 22-32mb. A large format 5x4" film is the equivalent to 200mb; that's 8K. New televisions don't usually reach this resolution! Now, I am often quick to judge when someone preaches about how more mega pixels equals a better image. It's really not. If you have an awesome camera but a poor bit of glass then you may as well be looking through fog.

Next purchase... two more lenses to complete the large format kit for my trip to Normandy this summer. Watch this space!

In Art, Photography, Sian Wright Tags 5x4, film, large format, Photography
IMG_20160524_185611363.jpg

DIY Photoimageable Resist Etching w/ UV Nail Lamp

May 27, 2016

I wanted to document what I've learnt recently when it comes to doing photo-etching at home as there's a lack of information online when it comes to timings particularly when you don't have a specialised UV exposure unit! Photo-etching isn't for the faint hearted and can be a pain if you don't follow each step to the letter. If you want an introduction to printmaking, Printmaking A Complete Guide to Materials & Process by Bill Fick is an excellent read.

To prepare stencil:
  1. Open digital image (JPEG) in Adobe Photoshop. If in colour, Image > Adjustments and select either, Desaturate or Black & White, then fine tune the image. You will need an image of medium-high contrast with good areas of black and white.
  2. In photo-etching, you will need to add a fine grain to the plate for the ink to adhere, otherwise it will simply wipe away clean in areas that should be dark. To do this, usually you would add an aquatint or use an aquatint screen but an easier method is by Bitmapping your image. Firstly, Image > Mode > Grayscale, then Image > Mode > Bitmap. It will request a resolution output and generally if your image input is 240-300 dpi, you will need to set it lower ie. 200 dpi range then select Method - I use diffusion dither but it's up to your aesthetic preference! Print bitmapped image as grayscale onto acetate or transparency (ink jet or laser is fine).DSC_0056
**Advanced stencil preparation:

You can prepare a duotone photo-etch (printing with two plates) by preparing the same image with two outcomes. One stencil is lighter with small areas of detail (top layer) and the other darker with large areas of detail (base layer).

Or, for a four colour separation CMYK (printing with four plates) you will need to prepare you stencil by separating the colour channels of your image. Firstly, go to Image > Mode > CMYK Color then, go to the Channels panel (if not shown, check on the Windows tab to see if ticked). Alter Brightness & Contrast, as well as Levels for each colour channel in the Image > Adjustments menu. You will need to ensure that each colour channel has a medium-high contrast. To separate channels into files, select ∨≡ button on Channels panel and select Split Channels. 

Continue to bitmapping.

Plate Preparation:
  1. Traditionally, zinc or copper plates are used in intaglio processes. Whilst copper is easier to work with, it's a tad expensive.To prepare a plate you will need to do the following:
    1. File and bevel edges to 45 degrees and soften corners.
    2. Remove protective film and clean plate with white spirit.
    3. Degrease plate. Normally, you would use ammonia and whiting powder some printmakers use soy sauce, concentrated washing up liquid, white vinegar and bicarbonate of soda etc. This is an important step as it helps with the adhesion of emulsion on the plate. Note: DO NOT TOUCH THE PLATE ONCE DEGREASED (clean gloves are recommended).
    4. Another good measure, is to rinse plate with distilled or deionised water as it reduces potential water marks. Remove excess water with clean cloth and finish with a blow dryer.
  2. There are two mediums that you can use, photoresist film and photoresist emulsion. They both have their pros and cons, personally I prefer the emulsion but if you want to reuse the plate then I would recommend film.
    1. Film: Cut film slightly larger than the plate. Spray plate with a fine water mist and remove backing sheet on film (you may need tweezers)  then lay on top of degreased plate. You will need to run plate and film in a printing press to adhere film. Afterwards, remove protective layer on film and trim down to fit plate. This needs to be placed in an oven for at least 20 minutes to cure or left overnight.
    2. Emulsion: Using a palette knife, mix some emulsion with 1-2 drops of reducer. Roll on emulsion until there is an even coverage and a semi-matte finish. Place in dryer for 20 minutes and allow to cool.
Expose plate

 To expose a plate, I used a UV nail lamp from eBay. You can figure out your ideal exposure times with a step test as they can change depending on your stencil. For an image like below, it took a 45 second exposure. For a lighter stencil, reduce the time and a darker stencil, lengthen the time. **Note: UV lamp stands 3.5inches away from stencil.

Screen Shot 2016-05-27 at 12.03.53

I use an old photo frame for exposure by sandwiching the backing board, plate, stencil (reversed) and glass clipped together.

Developing Plate

Once exposed, develop plate in a solution of bicarbonate of soda (1-2tbsp) and water (1 litre). If development is slow, add a little more bicarbonate of soda. It can take time to develop but continue agitating the tray and gently wipe the surface of the plate with a sponge or brush. *Note: emulsion is fragile

After development, rinse and remove excess water. Place underneath UV lamp for another exposure to harden emulsion.  You're ready to etch.

DSC_0056.2

In Art, Photography, Printmaking, Sian Wright Tags etching, Photoimageable resist, UV nail lamp

Experimental Studies at University of Northampton

September 13, 2014

While I have yet to successfully utilise the facilities at the University of Northampton as I am still learning its quirks, here are some experimental studies when layering photographs to explore indexical transparency and the photographic frame. Hopefully there will be more to follow soon! Experimenting with the frame (2)

Deliquence (2)

Deliquence (1)

In Fellowship, Photography, Print, Sian Wright, University of Northampton

Latest Posts

Featured
May 22, 2023
Creative Reactions // Pint of Science 2023
May 22, 2023
May 22, 2023
Jul 10, 2019
Associate Artist
Jul 10, 2019
Jul 10, 2019
Nov 26, 2018
Heidi Bucher @ Parasol Unit
Nov 26, 2018
Nov 26, 2018
Jun 22, 2018
Nottingham trip
Jun 22, 2018
Jun 22, 2018
Jun 5, 2018
Postman Time in the Blue Room
Jun 5, 2018
Jun 5, 2018
Nov 6, 2017
Frequency Festival of Digital Culture
Nov 6, 2017
Nov 6, 2017
May 21, 2017
A brave new world...
May 21, 2017
May 21, 2017
Dec 8, 2016
Intrepid Camera Co.
Dec 8, 2016
Dec 8, 2016
Nov 7, 2016
UKYA National Festival: Derby 2016
Nov 7, 2016
Nov 7, 2016
Oct 11, 2016
COUNTDOWN - UK Young Artists National Festival: Derby 2016
Oct 11, 2016
Oct 11, 2016

© Sian Wright All Rights Reserved. 2013 - 2025